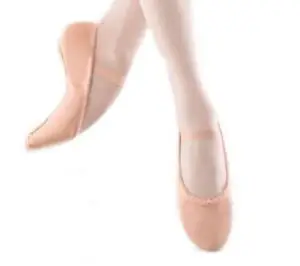
When it comes to ballet, the right pair of ballet slippers will really impact your dance routine. Traditionally, ballet slippers were held tight around the foot using ribbons.
However, today there is an option of fitting elastics to your ballet shoes instead of ribbons. They make the shoe easier to wear and take off while still holding the shoe tightly around your feet. This however does not mean that ribbons have completely been cast away in ballet.
They are however used during competitions as they are more aesthetically pleasing compared to elastic ballet shoes.
In this article, we are going to be talking about the two methods to sew elastics ion ballet shoes, their differences, their pros and cons, and who will prefer to use which design. Stick around to learn all this and more.
Recommend reading: How to Make Ballet Slippers?
Which Should I Sew? Single or Criss Cross Elastic?
What is ballet elastic?
Ballet elastic is the strip of elastic attached to ballet shoes to make them tight on the dancer’s feet to keep the shoes secure as they perform their elegant maneuvers. They are easier to use compared to ribbons.
This is because, unlike ribbons which you have to tie around your feet and can at times get loose, you only need to slightly stretch the elastic for you to slip your foot into the shoe.
In this era, you can buy ballet shoes with elastic already sawn on them. There is however the option of sawing them yourself to get that perfect fit specifically for your feet. There are two ways to sew elastic on ballet shoes. They include single elastic and criss-cross elastic. Both styles are discussed below.
Single elastic
With this, there is only one strip of elastic attached to the ballet shoes. This makes it simpler for the dancer to slip the shoe in or take it off compared to criss-cross elastic. Their ease of use makes it perfect for use by small kids. They can simply stretch the elastic and slip their little feet in. It however has its own advantages and disadvantages. They include:
Pros
1. Very easy to sew– the design does not require complicated sewing techniques to attach the piece of elastic to the shoe since there are only two attachment points on each shoe. It is also good to note that less elastic is required.
2. Easy to wear and take off– compared to the crisscrossed design, the single elastic is not as tight making it much easier to expand and slip your foot in and out of the shoe. This makes it more convenient for small kids since it requires less energy to wear ballet shoes.
Cons
1. Loose compared to criss-cross elastic– this is because only one piece of elastic is used meaning that the shoe is not held tightly around the foot. This might pose a problem for those with slim feet as the shoe might accidentally sleep mid-routine. It also makes it less ideal for those who love to feel as if they are wearing a second skin while In their ballet shoes.
2. Provides less support– since it is not as tight as crisscross, meaning that it won’t cling to the arch as tightly, dancers will have to use more of their muscle power to make their feet pop out more when pointing.
Criss-cross elastic

With this design, more than one strip of elastic is used. The shoe fits more tightly around the feet decreasing the chances of slipping off while dancing. This also means that more strength is required to put on the shoes making them less ideal for small kids. It is mostly used by elder children and pros.
Its advantages and disadvantages include:
Pros
1. Tight around the feet– with more elastic used, the shoe hugs the feet more tightly compared to single elastic. This means that the dancer can perform more complex maneuvers without having to worry about the shoe slipping off.
2. Perfect for any foot shape– it is especially great for those with slim heels as the shoe won’t be loose around the feet.
3. Better support– with the shoe tight around the feet, it offers support to the dancer when pointing. This means that less leg muscle is required to maintain the shape of the arch.
Cons
1. Harder to sew– with more elastic required, sewing becomes harder and it requires someone experienced to get the positioning of the elastics just right.
2. Harder to put on and take off the shoe– With more force required to put on the shoes, it is not ideal for use by younger children. There is also the risk of accidentally slipping the foot in between the elastic strands.
In conclusion, the main differences between the two designs are:
| Single elastic | Criss cross Elastic |
| Single elastic strip required | More elastic strips required |
| simple sewing | more complex sewing required. |
| Loose around the feet | Tighter around the feet |
| Easy to slip on and off | Harder to slip on and off. |
| Offers less support when pointing | Offers more support when pointing. |
How to Sew a Single Elastic on Ballet Slippers?
Since only one strip of elastic is required for this design, it is simpler to sew.
Tools needed
• Sewing thread (preferably the same color as the shoes)
• A needle
• A pair of scissors
• A pencil
• Ballet shoe elastic (buy a long piece just in case)
Detailed steps
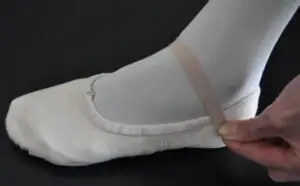
1. Fold over the heel of the shoe. Take your pencil and mark where the rim of the shoe meets the stitching line. This is where the elastic is supposed to be attached.
2. Stitch one side of the elastic onto the sock lining and binding found on the inside of the shoe. Avoid sewing through the outer material of the shoe.
3. Put on the shoe and stretch the elastic over your leg to find the perfect tension desired. Mark on the elastic where it meets the binding on the other side and stitch.
4. Do this for the second shoe and you are done.
5. Fit the shoes to make sure that everything is secure and correctly placed.
How to Sew a Criss-Cross Elastic on Ballet Slippers?
With criss-cross elastic, the positioning of the elastic solely depends on the dancer’s preference. Some like the elastics attached a little bit further back. There is also the length and angle of the elastic to consider before sewing.
Tools needed
• Sewing thread (preferably the same color as the shoes)
• A needle
• A pair of scissors
• A pencil
• Ballet shoe elastic (buy a long piece just in case)
• Pins
Detailed steps
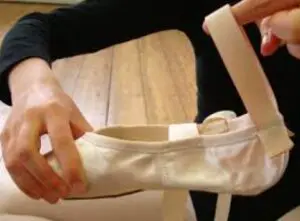
1. To find out the right position and length of elastic required, wear the ballet shoes and tuck one end of the elastic and use a pin to secure it well. Stretch the elastic over your foot and mark on the shoe where you prefer to stitch the elastic. Once you find your preferred tension, mark on the elastic where you need to cut.
2. Cut the two pieces of elastic to the marked length
3. Use a lighter or a match stick to burn the ends to avoid them fraying after you sew them in.
4. Secure the elastics on the marked locations and sew them into place. Make sure to do a neat job and avoid sewing through the outer material of the shoe.
5. Repeat the same process for the other shoe. Fit both shoes when done to make sure that everything is secure and correctly placed.
How Tight Should the Elastic Be on Pointe Shoes?
Unlike ribbons which are easy to adjust how tight they feel around the feet, elastics need to be perfectly calibrated to avoid future issues. With each dancer’s feet being unique from another dancer’s, the elastics should be calibrated to fit the user’s preference.
When fitting elastics on your ballet shoes, make sure that they are not too tight. This might interfere with circulation in your feet which might ruin your dance routine. They should also not be too loose as this might make the shoes accidentally slip off during a complex maneuver.
Before sewing the elastics in place, make sure that you can fit one finger snuggly between the elastic and your foot without any fuss.
How Do You Tighten Ballet Shoes?
Ribbon ballet shoes are the simplest to tighten and adjust. You simply undo the knot you had closed and either tighten or loosen the tension on the strings as you desire.
When it comes to elastic ballet shoes, the tightness should be predetermined before sewing on the elastic as the preset calibrations will most likely remain permanent. The only way to tighten the elastics would be to undo the stitch and resew the elastics back on after adjusting their length.
When it comes to loosening the elastics, it is almost impossible to loosen the elastics unless there was some extra elastic left dangling when it was stitched in place. If this is the case, simply undo the stitching, loosen the elastics to your desired length and sew them on again.
Alternatively, get a longer piece of elastic and replace the shorter piece with this.
How Do You Put Elastic Back in Ballet Shoes?
If you had recently replaced elastics with ribbons and you desire to go back to elastics it is pretty simple. Just cut the stitching that attaches the ribbons to the shoe and remove the ribbons. Secondly, gather the required materials you would need to sew on the elastics (same as above) and follow the procedure written in the above sections to sew on the elastics.
Sewing tips you should know
• When sewing, make sure you use a string and elastics that are the same color as your shoe to avoid color clashing.
• Try making the sewing neat by spacing each stitch evenly.
• Once you are done, make sure you tightly knot the end to make sure it does not get undone when dancing.
• Avoid sewing through the outer material of the shoe. This keeps the shoe looking neat.
FAQ:
1. Why use elastic but not ribbons on ballet slippers?
Elastic on ballet shoes is much more convenient as it is easy to slip the foot in and out of the slipper. Ribbons are also complicated to tie around the foot and when tied incorrectly will open while dancing.
2. When should my kids wear elastics and when to wear ribbons?
Elastics are more convenient for practice as they are easy to wear and slip off. This means that they are less time-consuming. Ribbons are a more elegant yet complex design. They are better used during competitions. Just be sure to practice using ribbons to increase familiarity.
3. Can I wear single or criss-cross elastic with ribbons?
Yes, you can. Just be sure to sew on the ribbons at the same time you are sewing on the elastics. People however consider criss-cross elastics plus ribbons overkill.
4. Can I sew them on the sewing machine?
You can sew the elastics using a sawing machine. It is however advised to sew them on by hand as the sewing machine will puncture the outer satin of the shoe meaning they won’t look as nice.
5. Can I put elastics on pointe shoes?
You can use either elastic or ribbons or even both on pointe shoes. It all depends on what you desire. The methods for sewing the elastics are the same as above.
Conclusion
Having elastics to hold your ballet shoes in place is great. They make the shoes easy to put on and take off compared to ribbon ballet shoes. It also eliminates the hustle of having to keep on tying the ribbon each time it comes loose.
Just make sure to adjust the tightness of the elastics perfectly before sewing them on. The last thing anybody would want is the shoes to either be too tight or to slip off mid routine.
