Ballet slippers are available in a variety of styles, ranging from extravagant to extremely simple.
The ballerina slipper is an essential piece of dance equipment. It has nothing to do with fashion. If you enjoy ballet but want to stand out from the crowd, you may build your personalized ballet slippers.
You can’t go wrong with a stunning pair of ballerina shoes if you want a basic, elegant look. Ultimately, there is only one thing preventing you from fulfilling your dreams. They are not cheap!
The elegance doesn’t come cheap, and if you have a thing for ballerina shoes, you’re in for a financial shock.
Recommend reading: How to Sew Elastic on Ballet Slippers?
Sizing:
Putting your feet down on a piece of cloth and tracing them is the quickest approach to get the proper size. After you’ve traced your feet, increase the size by a minimum of a quarter-inch.
You can increase more if you’re planning to put a lining inside the slippers to accommodate the seam. Unless you’re using a material that has some flexibility, the measurement of your shoes must be exact for them to appear great and not fall off while you’re walking.
What Are the Materials Used to Build Ballet Slippers?
Ballet slippers typically had leather soles, and if you’re going to wear them outside, you’ll want to opt for something tougher than cotton.
Ballet slippers’ uppers are generally constructed of leather or cotton, each performer has their own choice.
While leather is shinier and has a more polished appearance, cotton offers a more comfortable fit and does not warm your feet due to the fabric’s ability to breathe. When picking your materials, keep the stitching work in mind as well.
How to Sew Ballet Slippers?
There are various steps to making ballerina slippers. You must take the following actions:

Step 1: Take Dimensions of Sole
Remove the bottom of the box. Ballet slippers must be nicely fitted to the foot. Examine from the back of your heel to the tip of your big toe, as well as across the broadest area of your foot.
Cut a piece of leather the length and breadth of your dimensions, rounding the cloth at both the heel and toe.
Trace your foot directly onto the leather for a more precise fit. Allow about a quarter-inch of room around the foot at the heels and toes, then round the form into an oval on the side. On the reverse of the leather, you can use chalk.
Step 2: Create Slipper’s top
Create the slipper’s top. You may make the top out of any fabric you prefer. The form will be the same as the bottom of the slipper, but it will need to be an inch or two longer and wider for children and a bit wider for adult people.
This figure is strongly dependent on the thickness of your foot, but for most individuals, 2 to 3 inches of additional cloth should be enough.
Step 3: Cut a Hole
Drape the piece of cloth over your foot so that it drapes over your toes and hits the floor to decide where the hole should be.
On the floor, there should be at least 1/4 inch of cloth. To stitch the parts together, you’ll need this much more.
Wrap the cloth around your foot until it reaches your ankle. Then, measure 1/2 inch beyond this position and make a mark. This is the entrance to your foot hole.
Just above the heel and top of the foot, measure your foot. This dimension requires a hole that is at least 1 inch bigger. It’s preferable to have 1 1/2 inches. Now cut the hole according to measurements.
Step 4: Add Elastic in the hole
Fill the hole with elastic. Calculate how much elastic you’ll need based on the measurement you obtained of your ankle.
Use a piece of elastic that is 1 to 2 inches smaller than this length. To keep the slipper in place, the elastic will need to be snug. Stitch the ends of the elastic together with a hand or with a stitching machine, stitch the circle of elastic into the top of the hole, collecting the fabric as required.
Step 5: Stitch all parts together
Stitch the top and bottom together with a stitching needle and thread. To stitch through the leather, you’ll need a big needle, so be careful if you’re using a delicate cloth for the top.
Begin stitching from the toe of the slipper and work your way back. If you have any extra fabric, you may either trim it off at the rear before sewing them back together or collect it at the heel.
The cloth that is gathered in the rear is less visible than the cloth that is gathered in the front.
Step 6: Final Step
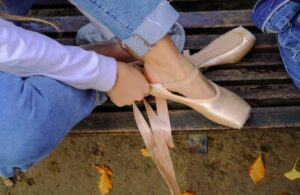
The final step is a blast! Stitch elastics or ribbons on them, wrap an elastic over the foot opening, and tie it in a bow like a small girl, or go for a non-ballet style by painting or beading the shoes.
Conclusion
On the day of a big competition, it’s not important to wear a pair of handmade slippers, but if you just want an additional pair to goof about in, they’re easy to make.
Recognizing that you built your ballet slippers will significantly enhance the excitement and pleasure of wearing them every time you practice your five poses or your twists and leaps, no matter how you customize them.
